François Louchet of the “Laboratoire de Glaciologie et de Géophysique de l’Environnement, Université Joseph Fourier Grenoble/CNRS” (CNRS is the French equivalent to the US National Research Council) and Alain Duclos (Avalanche expert and consultant as well as founder of the data-avalanche.org site) have done a lot of research on avalanche dynamics and published extensively in this field. What I particularly like about their work is the constant effort to link the fundamental research to actionable data i.e. making sure that the knowledge translates into meaningful recommendations for actions on the field. All too often I feel we get bombarded with “avalanche science” that leaves us wondering how this knowledge makes us any safer. It doesn’t help that the knowledge presented sometimes leads to conflicting conclusions with the prior “knowledge”… In any case, the article here describes slab release (avy) as a four-stage process:
1. Skier’s weight ‘breaks” the weak layer and thereby disrupts an unstable balance
2. Break propagates now under the slab's weight (up and down)
3. A localized crown crack occurs
4. Crown crack propagates (left and right)
An interesting fact to remember is that these four conditions are all necessary for the release of an avalanche i.e. if any one of these factors is missing there is no avalanche no matter how “bad” or unstable the conditions. This is of real interest for two reasons:
It focuses the skier’s attention on what really matters.
It helps us take nearby slopes really seriously, not only the one we are on.
Click here to access the article by François Louchet and Alain Duclos as well as the animations I made to (hopefully) illustrate and therefore facilitate the understanding of this four-step process.
If you only want to access part of the above, here are the links to the individual items :
The article
Animation of 4-step process
Animation of an avalanche on flat
Data-Avalanche
Monday, December 27, 2010
Sunday, December 12, 2010
At long last
After six articles about avy air bags on this very blog in 2009 + an avalanche + the broken leg that followed, I finally did it! I actually bought an avalanche airbag.


- Remote release – ABS System
- “Head on Top Technology” – Snowpulse
- Additional testing? – Snowpulse
I had isolated these four last factors, all exclusively taking into account safety features or aspects, while consciously deciding to forget all differentiators that did not directly relate to The Mission i.e. keeping me alive! The first factor reflects the volume advantage that the ABS bags have over Snowpulse whose bag inflates to 150 l which is the European norm min. requirement (volume IS a crucial element here, I just needed to figure out how relevant a 20 l delta was). The second one is a feature that could be important and that only ABS has and that enables your ski buddy to remotely release your bags would he see you go down. Head on Top Technology (H.O.T.) by Snowpulse is the very high and wrap around shape that their bag has. It is supposed to keep your head higher than the ABS and also protected from trauma as it wraps around your head. Finally I was curious to find out if there was any additional third party testing that had been done on the Snowpulse that I would not have known about.
With this level of indecision I naturally went to Snell. There the in-house expert spent a solid hour going through design, construction, craftsmanship, research etc. The answers to my queries above?
- 20 litres matters especially if the bags don’t fully deploy. It has happened that they deployed to 85 – 90% due to extremes in temperature or obstruction in the bag or poorly folded bags from a prior use etc. 85 – 90% of 170 l is 145 – 153 l (85 – 90% of 150 l is 128 – 135 l i.e. a bit away from the norm).
- Remote release was deemed a marginal item because there is plenty of time to release early on when you find out that you are in an avalanche. I still like it a lot.
- Head on Top Technology can even be deemed a detriment as it does not keep your field of vision open neither your arms free enough for all-out swimming. Assuming you wear a helmet (which I am not so very good at) the advantage is just not there but the detriments are too sizeable to overlook.
- Additional research, other than that presented in my articles last year? Nonexistent. This was very important to me as virtually all the data and successes of these products then belong to ABS System.
One additional and important differentiator was pointed out to me: ABS has two bags (knew that) inflated by two separate valves (did not know that) which means that would something go wrong it still remains very unlikely that the ABS system would ever completely fail.
As you probably figured out by now, I bought the ABS System. I believe that in December 2010 it is the only alternative that is documented and known to work well, now and for the duration, with a 98+ success rate. It is possible that a few years from now, as more research and data comes to light, either or both BCA’s Float30 and Snowpulse’s bags will come out on top but that day is not today.
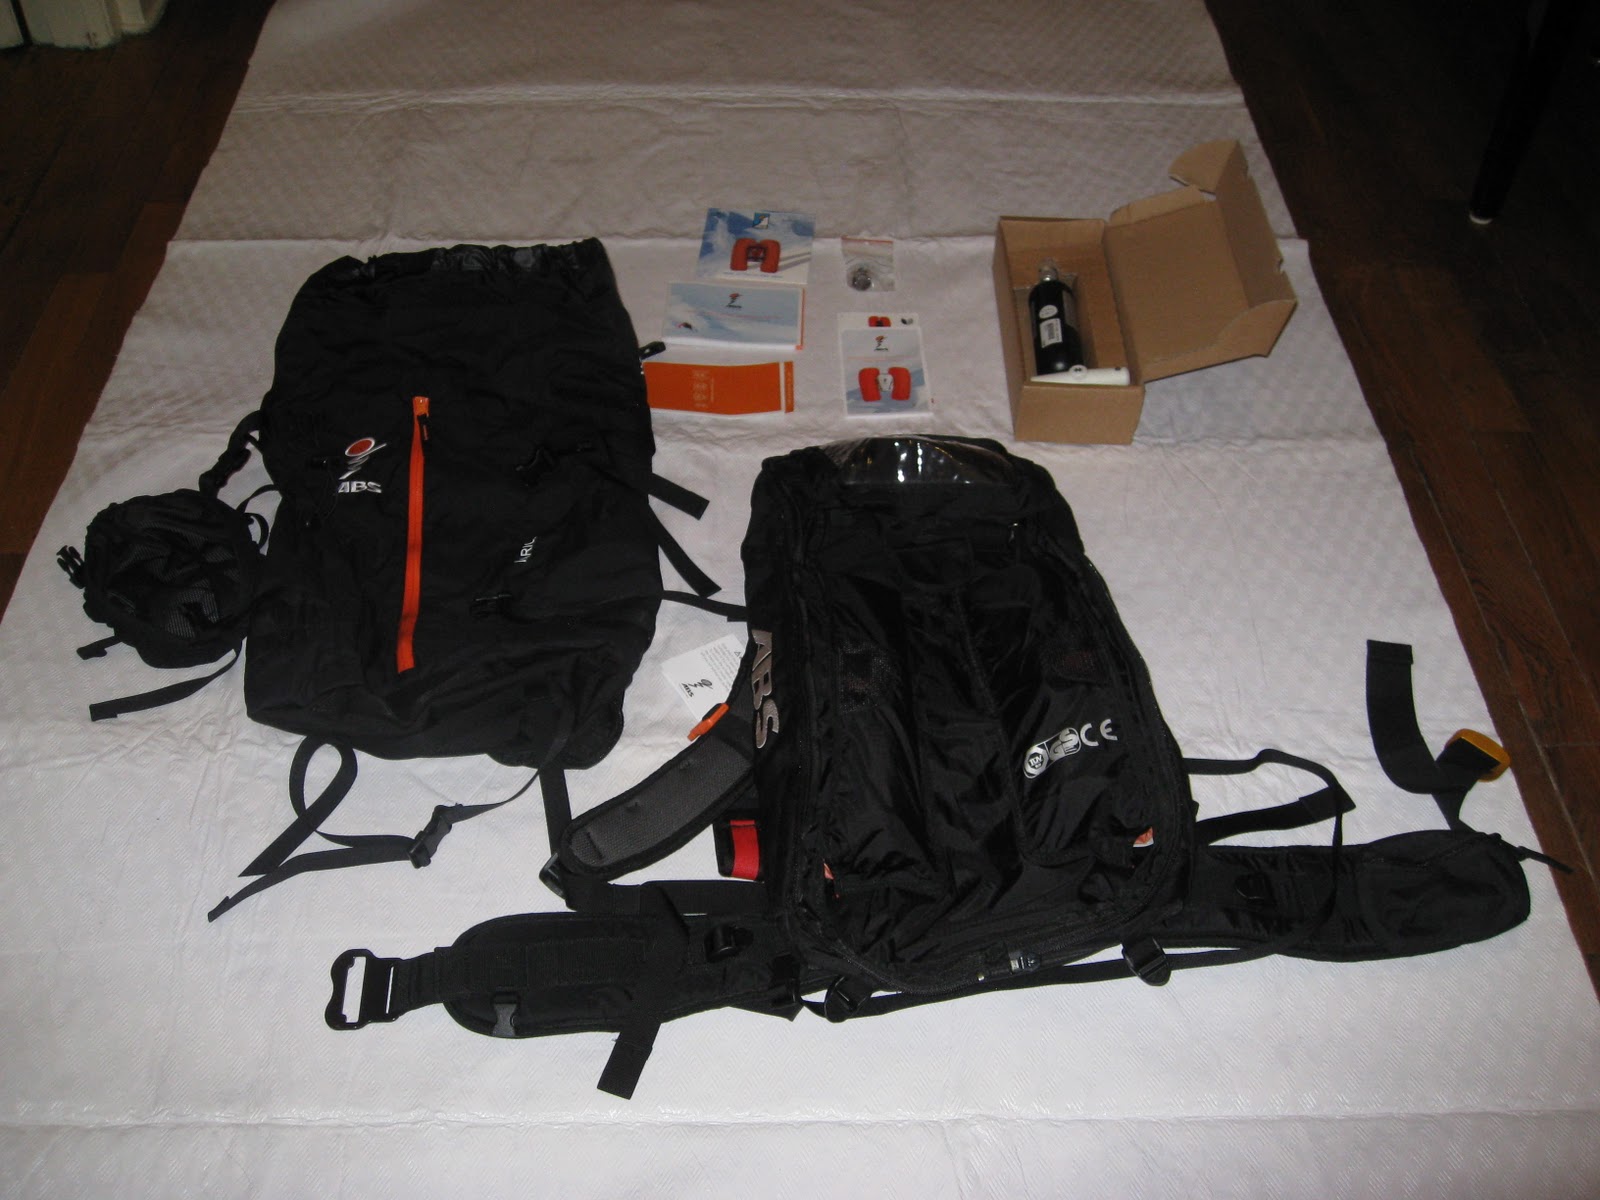
So, how does this work? Here is what you get (click to enlarge):
 Bottom right is the “Base Unit” (the safety part) that is where the bags, the release mechanism and the valves etc are. To the left is the backpack that you zipper on to the Base Unit. Upper right hand corner (in the cardboard box) is the cartridge and the release handle (these are replaced after every inflation). Finally you get a bunch of (good) documentation including a very exhaustive DVD (top middle).
The consumables are the cartridge and the release handle:
 I got to test one in store on my bag to make sure it all works and that I know how to release it. The replacement cost of this set is 89 euros (about $115 or so). ABS recommends you blow one of these per season although snell told me every 3 - 4 years should be fine provided the bag is stored in a clean, safe and rodent free spot... One end of the release handle has a red dot the other end tells you fabrication date and expiery date, mine says 2010 and 2014 respectively.
The cartridge has to be screwed into the top of the base unit and can stay there for the season:

Here you can see where the airbag comes out of (for an inflated view go to the very first image above or to the respective articles):


 When folding the bags back in, I was told that the "accordeon" fold (as opposed to say a roll) is "preferable". I remeber from my sky diving days that the accordeon fold is pretty much the only fold and that will be my one and only method here...
The backpack comes with shovel and probe storage, A-Frame ski straps, ice axe strap etc. I picked the 30 l bag but can adapt any size from 15 l to 50 l plus compatible packs from Millet, Arva and soon Deuter. I had pretty low expectations on the bag but found out that it is a very good quality bag well designed for AT touring and/or ski alpinism. This is what the back pack looks like without the helmet pocket:
 ...and with the helmet pocket on:
 Here is a sequence that shows how you attach the back pack to the base unit:


 On the purely nice to have here a few things I liked or appreciated. First a very small thing but I found the exact same wistle as I have on my 30 l Black Diamond (1), I use it to call Skadi back when it is really windy. Second I like that it is hydration pack ready (2) and finally I like the heavy duty buckle system that seem to be a cross between an alpine harness buckle and a vintage airlplane buckle (3):

So, how much did I pay for this bewinged backpack? 699.00 euros for the base including cartridge and release handle plus 99 euros for the 30 l backpack i.e. a total of 798 euros (about $1,050 - $1,100 incl. taxes). The full product name for this bag is the "ABS Vario 30". I hope that anyone who reads this won't have to wait to get caught in an avy before going to the store. The chance to make it through the avy and to the store is just about 50% without it and a bit north of 98% with it...
The prior posts on avy bags are here:
How it works: http://the-whippet.blogspot.com/2009/10/avalanche-pack-how-it-works.html
Overview: http://the-whippet.blogspot.com/2009/10/inflatable-avalanche-pack.html
ABS System: http://the-whippet.blogspot.com/2009/10/avalanche-pack-face-off-1-of-3.html
Snowpulse: http://the-whippet.blogspot.com/2009/10/avalanche-pack-face-off-2-of-3.html
BCA Float30: http://the-whippet.blogspot.com/2009/10/avalanche-pack-face-off-bca-float-30-3.html
Conclusion: http://the-whippet.blogspot.com/2009/10/avalanche-pack-face-off-conclusion.html

On Friday afternoon Jana drove me to Chamonix where I was going to the mother of all stores: Snell Sports on rue du Dr Paccard (kinda Main Street Cham). This place is incredible, it is large (three stories) and carries some of the coolest mountaineering stuff, including some you never heard of. I have so far never had enough time in there; I always had to leave before I felt “I was done”. Not only is it a wonderful place, the sales people in there are actual, real life experts on this stuff. Just the place for me to go to for a mission critical purchase.

After my series of articles (see the links at the bottom of this post), I was still uncertain as to which one to buy. There was the, by far, cheapest BCA that looked good although VERY new, it was not even on the market at the time I wrote the articles, and then there are the two leaders: ABS Systems and Snowpulse. I had decided I was not going to buy the BCA as it still is unproven and I could not find a single independent test on it. So I was left with ABS Systems and Snowpulse. ABS (the inventor of this product and creator of this market) is on the market since 1985 while Snowpulse has just a three years history on the market. There is a wealth of test data done using the ABS (showing a 98%+ survivability) and a lot of documented cases of avalanche survivals in the Alps using this bag. By force there is a lot less on the Snowpulse. However Snowpulse has some features that are appealing so I did not want to rule them out. After a lot of research I wrote down on a piece of paper:
- 170 litre volume – ABS System- Remote release – ABS System
- “Head on Top Technology” – Snowpulse
- Additional testing? – Snowpulse
I had isolated these four last factors, all exclusively taking into account safety features or aspects, while consciously deciding to forget all differentiators that did not directly relate to The Mission i.e. keeping me alive! The first factor reflects the volume advantage that the ABS bags have over Snowpulse whose bag inflates to 150 l which is the European norm min. requirement (volume IS a crucial element here, I just needed to figure out how relevant a 20 l delta was). The second one is a feature that could be important and that only ABS has and that enables your ski buddy to remotely release your bags would he see you go down. Head on Top Technology (H.O.T.) by Snowpulse is the very high and wrap around shape that their bag has. It is supposed to keep your head higher than the ABS and also protected from trauma as it wraps around your head. Finally I was curious to find out if there was any additional third party testing that had been done on the Snowpulse that I would not have known about.
With this level of indecision I naturally went to Snell. There the in-house expert spent a solid hour going through design, construction, craftsmanship, research etc. The answers to my queries above?
- 20 litres matters especially if the bags don’t fully deploy. It has happened that they deployed to 85 – 90% due to extremes in temperature or obstruction in the bag or poorly folded bags from a prior use etc. 85 – 90% of 170 l is 145 – 153 l (85 – 90% of 150 l is 128 – 135 l i.e. a bit away from the norm).
- Remote release was deemed a marginal item because there is plenty of time to release early on when you find out that you are in an avalanche. I still like it a lot.
- Head on Top Technology can even be deemed a detriment as it does not keep your field of vision open neither your arms free enough for all-out swimming. Assuming you wear a helmet (which I am not so very good at) the advantage is just not there but the detriments are too sizeable to overlook.
- Additional research, other than that presented in my articles last year? Nonexistent. This was very important to me as virtually all the data and successes of these products then belong to ABS System.
One additional and important differentiator was pointed out to me: ABS has two bags (knew that) inflated by two separate valves (did not know that) which means that would something go wrong it still remains very unlikely that the ABS system would ever completely fail.
As you probably figured out by now, I bought the ABS System. I believe that in December 2010 it is the only alternative that is documented and known to work well, now and for the duration, with a 98+ success rate. It is possible that a few years from now, as more research and data comes to light, either or both BCA’s Float30 and Snowpulse’s bags will come out on top but that day is not today.
So, how does this work? Here is what you get (click to enlarge):
The consumables are the cartridge and the release handle:

The cartridge has to be screwed into the top of the base unit and can stay there for the season:

Here you can see where the airbag comes out of (for an inflated view go to the very first image above or to the respective articles):


The backpack comes with shovel and probe storage, A-Frame ski straps, ice axe strap etc. I picked the 30 l bag but can adapt any size from 15 l to 50 l plus compatible packs from Millet, Arva and soon Deuter. I had pretty low expectations on the bag but found out that it is a very good quality bag well designed for AT touring and/or ski alpinism. This is what the back pack looks like without the helmet pocket:


So, how much did I pay for this bewinged backpack? 699.00 euros for the base including cartridge and release handle plus 99 euros for the 30 l backpack i.e. a total of 798 euros (about $1,050 - $1,100 incl. taxes). The full product name for this bag is the "ABS Vario 30". I hope that anyone who reads this won't have to wait to get caught in an avy before going to the store. The chance to make it through the avy and to the store is just about 50% without it and a bit north of 98% with it...
The prior posts on avy bags are here:
How it works: http://the-whippet.blogspot.com/2009/10/avalanche-pack-how-it-works.html
Overview: http://the-whippet.blogspot.com/2009/10/inflatable-avalanche-pack.html
ABS System: http://the-whippet.blogspot.com/2009/10/avalanche-pack-face-off-1-of-3.html
Snowpulse: http://the-whippet.blogspot.com/2009/10/avalanche-pack-face-off-2-of-3.html
BCA Float30: http://the-whippet.blogspot.com/2009/10/avalanche-pack-face-off-bca-float-30-3.html
Conclusion: http://the-whippet.blogspot.com/2009/10/avalanche-pack-face-off-conclusion.html
Friday, December 3, 2010
The Great White Tumbler
Pre Season Tour
Last Sunday I was “pre-season” touring at the Combe du Grand Cret in the Aravis mountain range with my ski buddy Skadi (my dog). This was supposed to be one of those solo conditioning tours getting fit and ready for the thick of the season to come. This was also my very first tour in the Aravis range and I was excited to get to explore this touring rich area. Up until now I had only been focusing on the Mt Blanc range around Chamonix with its, so far, very sparse snow cover making you almost wish for an avalanche risk of some sort which would imply some level of snow cover. The only avy report available was one for our entire area that dated from the 25th (three days old by the time of my tour) that said “moderate” avalanche risk. In any case I get myself to La Clusaz, the closest resort and I park at the furthermost parking lot.
The Up Track
I start skinning at 4,700 feet aiming for Tête Pelouse at 8,320 feet. The first thing I noticed, is that this thing was in its first part a lot steeper than I gathered from the guide book I had read, and also that we here had more snow than in Chamonix which was a bit of a surprise to me. As I get up the mountain on a track cut by two guys quite a bit up ahead, and a third halfway between me and them, it keeps getting steeper and the snow pack is made of a crust about two to four inches deep with two feet and a half of crisp, light powder under. This was at an elevation of about 5,500 feet a lot more snow than I had experienced in Cham just days before. Using my pole I can feel that the pack is a bit upside down with softer snow starting about a foot under the surface. Now I start getting a bit nervous, the skin track was solidly in the 35 degree range and the snowpack felt like it had a potential for some instability although I get no cracks nor any naturals in sight. I still get my Avalung out, fit it to my mouth and test it then leave it there just in case. I am now almost two thirds up the mountain and I know that soon I am getting into a traverse on pretty level ground so I keep going rather than turn around as I have reasons to believe that the snowpack on the far right side of the gully is less wind affected. I can now see three more people this time below me on the track. On one of my last conversions up I hear a woompf which I absolutely hate… In any case I am now on my traverse and breath a lot better, the terrain feels really flat and safe and I am moving towards the right of the gully where I will leisurely make the safest decision between continuing up if the conditions are different and good enough or just ski down from there in the light (as in not wind affected) powder to the bottom. The snow pack is now 3 – 4 feet deep depending on the spot which is a lot more than Cham and that’s remarkable to me considering this is lower elevation. But the terrain being so benign I now get to enjoythe views and the feel of this gully and I take a fair amount of pictures as I am trying to learn this, to me, new environment.
The BIG-CRACK
Suddenly, I hear a thundering “CRACK” and everything under me and around me is in motion and accelerates at an amazing rate. I immediately realize what’s going on and the first thing I do after going No! No! No! is to try to kick off my skis but just can’t do it (gave it a second or so). My next objective is to stay standing up as long as I can (that worked for about quarter of a second), finally I just decide I am going to swim furiously to try and ride this thing as high as I ever can although it is pulling me down hard. I go under and swim very frantically and hard to get back up. Once up I try to leverage the larger chunks of snow hitting them hard to pull myself up as much as I can and stay there as long as possible. Everything is moving at really high speed now. I get dragged down under again, and again I swim with all the rage I can muster and once more get back up, hit the big chunks and feel myself getting dragged down again but now I feel the movement slowing down a little, I swim, thrust and kick hard to the surface as I feel the snow closing in on me while squeezing irremediably harder, snow is now getting around my moth and nose and it is getting hard to breath just before the snow comes to a complete stop.
The Outcome
The verdict? I am immobilized with part of my face and almost 80% of my right arm outside; everything else is in a non-negotiable vice. I spit and blow to get the snow out of my mouth and nose and with a lot of relief take a deep breath. From there on I worked on trying to stay calm and focused. I felt a needed to get out of here fast because I knew I could not afford a second slide given my position (I couldn’t turn my head so there was no peeking up slope to see if there was any danger of that or not). The only objective was now to dig fast. Well that was a lot easier said than done. I found out that it is very awkward to dig with one arm sticking straight out and away from the snow. I was also feeling a lot of pain in my right leg and left shoulder as my position was one of a contorted corkscrew but with my skis still attached to my boots in a 190 degree angle where the right leg took “the extra 10 degrees”. My left shoulder was twisted in the opposite direction of my extra-10-degrees-right-foot. My left arm was in the vice stuck far up behind my back. Overall not your most comfortable tequila-drinking-lounging-on–the-beach position. I couldn’t even move the fingers of my left arm. I kept scratching as best as I could with my free hand till I finally was able to dig out my entire head, then my upper body and finally I was able to free my left arm (count 10 min.). That was a moment of some relief since freeing my left shoulder freed half the torsion on my right leg (the rest being due to both legs being at a 180 degrees plus angle). Now I was able to lean forward, get my back pack up over my head and get my shovel out so I could in no more than two or three minutes dig out my legs and finally, with the shovel, hit my Dynafit toe piece. That felt really good. I then digged out the other leg. From the slide stopping till now I would say about 14 – 16 min passed. Now I hear a voice from above asking me if this is an exercise or if I need help? I go “WHAT EXERCISE!!!” and indicate some help would indeed be welcome, and the guy asks if I am hurt, I look at my right foot and it looks as if it is in an unnatural alignment situation so I tell him “given the alignment my leg could be broken but the pain doesn’t seem severe enough so I guess I got a bad ankle twist”. In short order another three guys come over and with Skadi’s help find almost all my gear spread below me all over the slope. I get into some hyperthermic situation (shock?) and am very glad to have my down jacket in my pack, it heats me back up in 30 sec or so.
Two really nice guys decide to escort me down on my ski-out about 2,000 feet down. Another not really comfortable experience. I get to my car, drive to Annecy, Jana gets me to the hospital and I check out 48 hours later with a cast covering a plate and six screws on my fibula… FINALLY OVER! With a little luck I am back on my skis somewhere between mid to end of January.
Was I scared?
Naaah, of course not! Well, maybe a little. Actually quite a bit when I heard the BIG CRACK! That was the moment of realization that I was in some potentially really big trouble. It was quite freaky but I was so busy trying to figure out how to get out of it and taking the correct action that this fear lasted almost no time at all. The second moment of fear (terror?) was when I felt the snow closing in on me and breathing became an issue. That was by far the scariest moment and that one lasted several seconds, the time to spit out snow, starting to breathe better and finally realizing everything stood still. Paradoxically enough, this was also the moment of the highest relief through the whole incident as now knew this was a partial burrial. The third moment of fear, but this one lesser than the two prior, was the worry about a potential second slide but that one felt more remote. After that it was all work anyway so neither room nor time to feel any more fear.
Now what?
The trick now is to try to learn the (right) lesson(s) from this incident. For starters how about don’t tour alone in an area you don’t know and don’t have a fresh avy report for? OK, that’s a start.
I do replay this in my head every now and then partially because this broke on a slope that at its steepest but also smallest part is probably no more than 27-28 degrees and then (where I was) less than 20-25 (see pictures below). This was not the kind of slope where, as a group, we would have decided to go only one person at a time.
I think it must have been a perfect storm” combination of loose, very dry snow and a lot more wind on elevation than expected. I did notice that just before everything went to hell there was an upwind (more like a draft really) blowing on me so it could be that this was a bit of a wind tunnel kinda spot?
We all know that the safest routes are on ridge tops, looking at the pictures below maybe I should have gotten off the cut track and up and around? You do want to stay high and near the top if you must cross dangerous slopes or avalanche path however I completely failed to identify this spot as a dangerous slope.
Obviously there are a ton of factors that can contribute to avalanche conditions and the possible combinations of factors are endless. This clearly makes the forecasting of a possible avalanche somewhat tricky (trying to stay modest here). One thing I don’t like here is the fact that an environment that seems so benign can yield a not insignificant slide, what is that supposed to do for future assessments?
Your comments are welcome as I would love to get as many perspectives on this as possible to turn this into as effective a learning experience as ever possible.
Here are the pictures, (the crown is about 450 – 500 feet wide, up to 2 feet high and the total slide is on or about 1,000 feet) click to enlarge:

Here is part of the crown:

Here is a view of most of the slide with notes:

...and the would be sarcophagus:

Subscribe to:
Posts (Atom)